by Julia Jenkins Starkweather

Really, we don’t hear with just our ears?
One fact recurs repeatedly in studies of how listening helps a child’s learning process.
That fact is – they do not learn music and languages by hearing alone.
So many components stimulate their ears, minds and souls-
They need to hear and feel the rhythms.
They need to see visual color and shapes.
They need expressive physical movement like hopping and dancing.
Making music with kids is a great way to practice listening skills, improve attention spans, build confidence and encourage creativity. In addition, what better way to do that than during their playtime? Learning can be quite gentle and easy.
Try these eight musical activities and crafts you can initiate to boost your child’s memory and make their learning experiences more fun this summer.
- Start by trying something as simple as clapping hands. Listen for how many different sounds they can make just by using their hands. Call out directions and have your child reach with their arms for the stars, touch their toes, put hands on hips like a sugar bowl or spin in a circle with their arms flung out. Even very young children can participate in these activities.
- Blow bubbles. Go in the back yard where there is adequate room for spills and let your kids blow bubbles with a straw into a glass of water. Attempt to hum while blowing. They will soon be gurgling and giggling music to your ears.
- Make merry “bell wands”. You may already have small round bells and popsicle sticks at home. Or they are easy to find at a department store in the craft department. Help your kids glue the bells onto the ends of popsicle sticks and tap or wave them to the music on the radio while they sing their favorite song. Use what you have on hand and improvise for easy musical instruments. For instance, friends or siblings can sing along through an empty paper towel roll that you’ve saved.
- Create a guitar or harp. Have your child find an empty tissue or shoe box and stretch rubber bands over the opening. Encourage them to try all the different sounds they can make by strumming or plucking the “strings”.
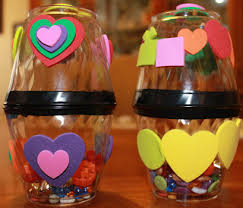
- Make sound shakers. Send your kids on a treasure hunt to locate several small treasures like buttons, coins, seeds or stones. Then place the objects in an empty soda or water bottle. Or tape the rims of two plastic glasses together. They can paint the bottles or apply colorful streamers and dance to the “music” they shake.
- Tin can chimes – Save your tin juice, soup or tuna cans. Clean them well with one end of the can removed. Help your kids decorate the cans by covering with colored paper or tempora paints and seal them with Modge Podge. Or use outdoor acrylic paints and glitter. Pierce the closed end with a small hole and thread floral wire or string through so that they look like a bell hanging. Hang them over a stretched string (like a low clothesline) or a string on a porch railing. Once suspended they are a colorful visual sculpture that also has movement. Your child can play them with sticks to make a variety of interesting sounds.
- Rhythm sticks – Invest in about a dozen wooden dowels that you can find at a local hardware or home store. Cut them into pieces to create “rhythm sticks”. These make a terrific tool for developing rhythm, good motor skills and just getting your kids moving. They make a wonderful interactive toy when several kids play with them together.
- Backyard Music Station or Banging Post – This is the most elaborate project, but well worth the effort for the hours of fun your children will have. Install a wooden post, or 2 to 3 posts in the ground. Attach a horizontal board to the post (or several to connect multiple posts). Locate metal household items that you already have to use as part of your “music station”. Look for things like cupcake pans, cooling or broiler racks or a metal colander. If yours are too nice or new, you could even make an adventure of finding items at local yard sales or thrift shops to use too!
You will need a drill and screws to attach the metal objects to your boards/post to implement your new “rhythm center”. Let the kids use old utensils or sticks to “play music” by rapping or dragging on the metal objects. Encourage them to use their imagination to discover changing patterns and new rhythms. It’s also an amazingly fun way for learning to follow directions while another acts as the leader.
Be a firm believer in the power of music and the benefits your children obtain from doing more than just listening. Let music be an educational, fun and therapeutic activity for your child’s summer exploration.
Julia Jenkins Starkweather has been a Great Lakes Bay Mom for 28 years. The mother of two bright and talented kids, she has been an international marketing director, creative visual designer and youth music teacher for over 40 years. She is currently the owner and vocal coach of First Academy of Performing Arts in Bay City, Michigan.
