Hillary, a.k.a The Lesson Planning Mommy, is one of our fabulous Great Lakes Bay Moms Members. Hillary has a bachelor’s degree in Early Childhood Education pre-school through third grade and a Master degree in Elementary Education grades K-8 with a reading endorsement K-12 grade. She loves creating meaningful, mind provoking activities and lessons for kids.
Happy Halloween!
![393289_10150982080465403_1110931823_n[1]](https://greatlakesbayparents.com/wp-content/uploads/2012/10/393289_10150982080465403_1110931823_n1-224x300.jpg) I hope you enjoy all of these activities, songs, snacks and videos just as much as my little monsters and I have! Make this a Halloween they’ll never forget – get creative and have FUN!
I hope you enjoy all of these activities, songs, snacks and videos just as much as my little monsters and I have! Make this a Halloween they’ll never forget – get creative and have FUN!
What We’re Reading:
The Night Before Halloween
By: Natasha Wing
By: Jonathan London
Arthur’s Halloween
Songs:
Dem Bones Dem bones, dem bones, dem dry bones,Dem bones, dem bones, dem dry bones,
Dem bones, dem bones, dem dry bones,
Now shake dem skeleton bones!
The toe bone’s connected to the foot bone,
The foot bone’s connected to the ankle bone,
The ankle bone’s connected to the leg bone,
Now shake dem skeleton bones! The leg bone’s connected to the knee bone,
The knee bone’s connected to the thigh bone,
The thigh bone’s connected to the hip bone,
Now shake dem skeleton bones! Dem bones, dem bones, dem dry bones,
Dem bones, dem bones, dem dry bones,
Dem bones, dem bones, dem dry bones,
Now shake dem skeleton bones! The hip bone’s connected to the back bone
The back bone’s connected to the neck bone,
The neck bone’s connected to the head bone,
Now shake dem skeleton bones! The finger bone’s connected to the hand bone,
The hand bone’s connected to the arm bone,
The arm bone’s connected to the shoulder bone,
Now shake dem skeleton bones! Dem bones, dem bones gonna walk around
Dem bones, dem bones, gonna walk around
Dem bones, dem bones, gonna walk around
Now shake dem skeleton bones! Five Little Skeletons Five little skeletons dancing in the door, One tripped and fell, and now there’s only four.
Four little skeletons happy as can be,
One fell apart, and now there’s only three.
Three little skeletons stirring up some brew,
One fell in, and now there’s only two.
Two little skeletons looking for some fun,
One got lost, and now there’s only one.
One little skeleton, nothing left to do,
It’s Halloween, and he’s coming for you! Boo! HUNGRY GHOSTS
Four little ghosts were hungry one day,
So they flew to a garden and munched away.
One ate cucumbers, one ate tomatoes,
One ate pumpkins, one ate potatoes.
Four little ghost, red, green, orange and brown,
Flew that night all through the town.
They were so colorful, everyone cheered
And the next thing you know, they disappeared!
Activities:
.:Cotton Ball Ghost:.
This is a super easy activity for any little goblin. You most likely have everything you need to create these friendly little ghosts, right in your house!
What You Need:
-
Black paper
-
Glue
-
Cotton balls
-
Hole puncher
-
Yarn or string
Directions:
***You can either give the kiddos a bowl of glue and have them dip each cotton ball in the glue and stick it onto the ghost, OR cover the ghost in glue and invite the kids to stick the cotton balls all over it.
-
Cut eyes and mouth out of black paper and glue on.
-
When it dries, punch holes at the top of the ghost and hang with yarn or string.
http://www.thechirpingmoms.com/2012/09/halloween-projects-for-kids.html
.:Make A Spider Web:.
This is a great activity for little fingers. It helps to build fine motor skills along with making a really cool and spooky spider web!
What You Need:
• Sturdy white paper plates![240520436319978951_glCYsoK7_c[1]](https://greatlakesbayparents.com/wp-content/uploads/2012/10/240520436319978951_glCYsoK7_c1.jpg)
• Hole punch
• White yarn
• Bobby pins
• Spider rings
Directions:
- Punch holes around the plate like above
- Attach one end of yarn through first hole and tie off. Attach a bobby pin to other end and weave
the yarn through the hole going across the plate back and forth. - Tie off end when all yarn is gone.
- To add a few scary details to the spider web, cut a spider ring – in the middle and attach to
the web.
http://www.mypreschool-crafts.com/fall.html
.:Make A Spooky, Spooky Skeleton:.
This is a fun activity to do with the older kids. They will have a blast singing the song “Dem Bones” and creating this Spooky, Spooky Skeleton with Q-Tips!
- 18 Q-tips
- Black card-stock or construction paper
- White paper
- Black marker
- Scissors
- White glue
Directions:
1. Begin by gluing 6 whole Q-tips on the black card-stock for the skeleton’s ribs.
2. Glue 1 Q-tip perpendicular over the ribs to act as the backbone. Have the Q-tip lie flush with the last rib, but poke up longer than the top rib, to act as the neck bone.
3. Draw a skull on the white paper with a black marker, and cut it out.
4. Glue the skull on the paper above and touching the neck bone.
5. Glue 4 whole Q-tips for the arm joints and leg joints, as shown in the finished photo below.
6. Cut 6 whole Q-tips in half, or make them even shorter if you like. These are smaller bones that can be used as the 10 fingers, and 2 to be the feet. Glue them in place.
7. Hang on your front door for the Trick-or-Treaters!
http://www.crafts-for-all-seasons.com/Q-tip-skeleton.html
.:Halloween Pictures… With your FEET and HANDS!:.
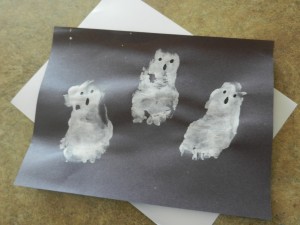
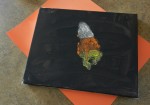
I had a blast with my six and one year old boys making Halloween decorations with their FEET and hands! My one year old thought it was hilarious! We talked about how it felt, smelled, and what colors we used. We made ghosts and candy corn out of feet and a spider from our hands. My six year old got a bit crazy with the paint and started making everything he could think of with his FEET! He even made a peacock! It was adorable! Here are a few of our projects that we made. I decided the first feet turned out so nice, we painted a few 8×11 canvases and added pictures to them as well. I think the Grandmas are really going to like them! Have fun and get creative…
.:Graph your Halloween Candy!:.
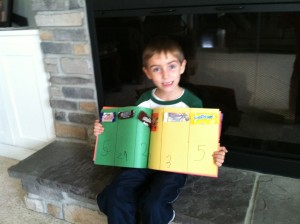
What do you do with all that Halloween candy, you ask? Graph it! Last year I did this with my Kindergartner and he loved it! Sorting… less than & greater than… graphing… writing… and CANDY! Sounds great to me!
- Sort your Halloween candy.
- Ask your little people to “estimate” how many pieces of candy they have. Then count to see if they were correct in their guess.
- Graph the candy on the floor.
- Ask questions like; “which kind of candy did you get the most of?” “Which candy did you get the fewest of?” “How many more _____ than _____?”
- Make a book about your Halloween candy. Record each type of candy on the pages. Use a wrapper from the candy along with the number of that kind they received Trick Or Treating!
Snack:
.:Halloween Boo Mix:.
What You Need:
- Golden Grahams cereal
![159244536793640273_1dojcEpq_b[1]](https://greatlakesbayparents.com/wp-content/uploads/2012/10/159244536793640273_1dojcEpq_b1.jpg)
- chocolate chips
- mini marshmallows
- candy corns
- sandwich baggies
- double stick tape or glue
- free printable Halloween Boo Mix Bag Topper printed on card-stock or heavy paper. (Click here for printable.)
Directions:
-
Mix all the food ingredients together.
-
Fill each sandwich bag halfway up and seal it.
-
Print a Halloween Boo Mix Topper onto card stock.
-
Cut out bag topper.
-
Fold the bag topper in half.
-
Staple to the top of your Boo Mix filled baggie.
http://www.sandytoesandpopsicles.com/2011/10/halloween-boo-mix-free-halloween.html
:.Make Your Own Halloween S’more:. 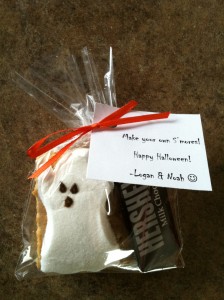
What You Need:
- Graham Crackers
- Hershey Chocolate Bars (Fun Size)
- Halloween Marshmallow Ghost (peep)
Videos:
CLIFFORD THE BIG RED DOG | Halloween
Ten Little Monsters

![157212008[1]](https://greatlakesbayparents.com/wp-content/uploads/2012/10/1572120081-128x105.jpg)
![14737731[1]](https://greatlakesbayparents.com/wp-content/uploads/2012/10/147377311.jpg)
![144125083[1]](https://greatlakesbayparents.com/wp-content/uploads/2012/10/1441250831.jpg)
![109423465917485913_kqMNMWYN_b[1]](https://greatlakesbayparents.com/wp-content/uploads/2012/10/109423465917485913_kqMNMWYN_b1.jpg)
![88664686383379313_vSUD6gsz_c[1]](https://greatlakesbayparents.com/wp-content/uploads/2012/10/88664686383379313_vSUD6gsz_c1.jpg)
![386023_10150982083030403_1332933801_n[1]](https://greatlakesbayparents.com/wp-content/uploads/2012/10/386023_10150982083030403_1332933801_n1-300x224.jpg)
